vrijdag 25 november 2016

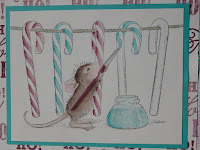
House Mouse Challenge #230 Colour Challenge


This House Mouse challenge is a colour challenge, we have to use some of my fav. colours: Turquoise and Purple + a neutral colour. My neutral colour is white (+ some brown to colour the mouse). My turquoise: Bermuda bay, my Purple: Rich Razzleberry. Love this colour combination and because Christmas is getting closer and closer I made another Christmas card. This time I did not use Distress ink at al! I coloured the image with my Stampin'Up! write markers + blender pen. For the big background I used designer paper with a pressed patern and gave is some colour using my ink blending tool. For the smaler background I stamped the sentiment Ho Ho Ho! Finished it off with the sentiment Jolly and some shaped enamel dots. Have yourself a JOLLY Christmas!


Materials:
- House Cling stamp Painting Stripes HMCP50 -
- Stampin'Up! Greetings From Stanta stamp set 143269 -
- Stampin'Up! Fancy Frost specialty designer paper 142014 -
- Stampin'UP! classic ink pad Bermuda Bay 131171 -
- Stampin'Up! classic ink pad Rich Razzleberry 126950 -
- Stampin'Up! Brights Stampin' Write Markers 131259 -
- Stampin'Up! Neutrals Stampin' Write Markers 131261 -
- Stampin'Up! Blender Pens 102845 -
- Stampin'Up! Christmas Greetings Thinlits Dies 139659 -
- Stampin'Up! Brights Enamel Shapes 141680 -


vrijdag 4 november 2016

House Mouse Challenge #229 Christmas

 Today exact one year ago I made my first House Mouse card for my first House Mouse challenge (All White). Time flies by! It was a white Christmas card and this challenge theme is Chritmas! Always a good theme, there is no such thing as too many Christmas cards. I was thinking about making another white card but couldn't resist the colour red. First I stamped the image and covered it with liquid masking film so I could stamp the snowflakes behind the mouse. Used some snow writer on his clothes to make it look warm and cozy!


Materials:
- House Mouse cling stamp Candy Claus HMCR09 -
- Katzelkraft snowflakes stamp -
- Stampin'Up! Greetings From Santa stamp set 143268 -
- Stampin'Up! Candy Cane Lane designer series paper 141981 -
- Stampin'Up! classic ink pad Real Red 126949 -
- Distress ink Vintage Photo - 
- Distress ink Ground Espresso -
- Distress ink Candied Apple -
- Distress ink Spun Sugar -
- Distress ink Tea Dye -
- DecoArt Snow Writer -

maandag 31 oktober 2016

My Favorite Things Sketch Challenge #304


Made some hot chocolate for this My Favorite Things sketch challenge.I went for the classic Christmas colours: red & white. The oval shape needed something extra so I cut the gummie candy out off a piece of designer paper and sticked them on. Used Distress ink to colour the chocolate milk and to give the oval and cream some colour. I'm ready for some hot chocolat milk! Are you?


Materials:
- My Favorite Things clear stamps Hug in a Mug LLD-48 -
- My Favorite Things Die-namics Hot Cocoa Cups MFT-803 -
- Spellbinders nestabilities Beaded Ovals S4-294 -
- Stampin'Up! Candy Cane Lane designer series paper 141981 -
- Distress ink Vintage Photo -

Casology Challenge #221 Cure


This weeks theme for Casology cue challenge is: Cure. The design for my card is simple, just 3 pieces of washi tape, one stamped image and a sentiment. Just used two colours to colour the image: crushed curry and mint macaron (which are the same as the washi tape).


Materials:
- Stampin'Up! Pedal Pusher stamp set 141312 -
- Stampin'Up! It's my party designer washi tape 140556 -
- Stampin'Up! classic ink pad Crushed Curry 131173 -
- Stampin'Up! classic ink pad Mint Macraron 138326 -

Case This Sketch challenge #196


Made a christmas card for this Case This Sketch challenge. I used only Stampin'Up! products. Designer paper for the background. The eyecatcher: a piece of gold striped vellum with a reindeer stamp on top. Put some gold thread around the neck of the reindeer.


Materials:
- Stampin'Up! Cookie-cutter Christmas stamp set 142043 -
- Stampin'Up! Jolly Christmas stamp set 139876 -
- Stampin'Up! Merry Moments designer series paper stack 139595 -
- Stampin'Up! Winter Wonderland designer vellum stack 139594 -
- Stampin'Up! classic ink pad Real Red 126949 -
- Stampin'Up! Gold metallic thread 138401 -

zondag 30 oktober 2016

Liftchallenge #110


Bij deze liftchallenge liften we een kaart van Paperpicnic Jayne (zie de afbeelding hiernaast). Het is de bedoeling dat de achtergrond kleur ook weer terug komt in de afbeelding in het midden. Daarnaast is het de bedoeling dat je een watercolor techniek gebruikt. Ik heb gekozen voor Brusho, ik heb de stempel ermee gestempeld en daarna met een kwastje en water ingekleurd. Extra kleur pakken is niet nodig, je kunt gewoon de Brusho van de randjes gebruiken. Voor de achtergrond heb ik designer vellum gebruikt met een zefde soort afbeelding als de stempel. Het vellum heb ik vastgezet met splitpennen.

Met deze kaart wil ik ook meedoen met de Christmascard challenge #46

Materialen:
- Art Specially Vintage stempel lap 2016 -
- Marianne Design clearstamp Christmas sentiments (eng) CS0980 -
- Stampin'Up! Winter Wonderland designer vellum stack 139594 -
-  Stampin'Up! Linnen Thread 104199 -
 - Brusho Dark Brown -
- Rode splitpennen - 

zaterdag 29 oktober 2016

Cheer up!


Just wanted to share this with you. I read a facebook post that told me about a sick girl. She have to go to the hospital many times for chemo. Luckly there is one thing that cheers her up, receiving cards! So I grabbed a House Mouse card that I made for an older challenge to send to this girl. I wanted to put something extra in the card for her so I made a little package so she can make her own little House Mouse card. She only have to colour the image and stick everything together. #HappyPost


vrijdag 28 oktober 2016

Dorp Grootz ATC's


Art Specially kwam vorig jaar met een hele leuke dorp stempel: Dorp Grootz. Met deze stempel heb ik 2 ATC series gemaakt. Met de stempel kon ik 2 kaartjes tegelijk stempelen. Daarna heb ik met een cirkel stempel (v/d Art Spelially feest lap 2014) op ieder kaartje 3 cirkels gestempeld. Bij de ene serie heb ik voor een kleur detail gekozen: alleen het stuk in de cirkels ingekleurd. Bij de andere serie heb ik het andersom gedaan en een zwart-wit detail gebruikt: alles buiten de cirkels ingekleurd. Ik heb de kaartjes ingekleurd met mijn Stampin'Up! write markers.


donderdag 27 oktober 2016

Kraftin Kimmie stamps challenge #354 Halloween


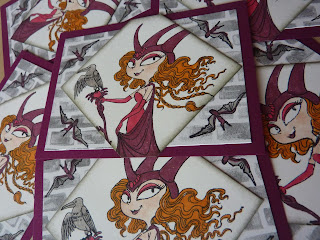
No black and orange, but PINK and BLACK for this Halloween challenge. I made this card for the Kraftin Kimmie Halloween challenge. I'm so in love with the Dragon Queen stamp that I used for this card and it took me a lot of time to make it. First I stamped the image on cardstock and on vellum (for the mirror). Then I masked the cardstock image with liquid masking film, while drying I made the mirror. After that I stamped the bats, removed the masking film and used black glitter embossing powder for the bats. Then I had to cut out half of the stamp to put the mirror behind the stamp. Pimped the card up with a background stamp, designer paper and a sentiment. Happy Halloween!


Materials:
- Kraftin Kimmie Dragon Queen by Annie Rodrique -
- Carabelle Studio 'Sans Titre' background stamp SED0007 -
- Creatable Marianne design Oval Frame LR0293 -
- Stampin'Up! Specialty Designer paper Halloween Night -
- Stampin'Up! classic ink pad Melon Mambo 126948 -
- Distress ink Tattered Rose -
- Distress ink Picked Raspberry -
- Distress ink Wilted Violet -
- Distress ink Spun Sugar -
- Ranger embossing powder Black Sparkle -
- Vellum -

dinsdag 25 oktober 2016

ATC Drinks


Toen ik mijn map met Art Specially stempels erbij pakte voor inspiratie voor mijn ATC's viel mijn oog op de tekstjes van de Feest lap (2014): champagne, wine, lemonade, beer, tea en coffee. Deze tekst stempels in combinatie met de stempel set mixed drinks van Stampin'Up! was het idee geboren voor een serie 'Drinks'. Na de ATC's met de tekst stempels van Art Specially was de inspiratie nog niet op! Met de Stampin'Up! stempels ben ik verder gegaan met: milkshake, tequila sunrise en grape soda (cassis). De kaartjes spreken voor zich, de stijl is simpel: een gestempelde achtergrond en het drankje erbovenop geplakt met foamtape. Voor de achtergrond heb ik stempels van Art Specially gebruikt en de volgende Stampin'Up! stempel sets: Gorgeous Grunge, Playful Backgrounds & Work of Art.


Halloween ATC's


Voor je het weet is het 31 oktober: Halloween! Om nog even in de sfeer te blijven van mijn vorige blogpost nog een paar ATC's in Halloween stijl. De grote vleermuis en 'Twinkle twinkle little bat' tekst stempel komen van een Alice in Wonderland stempel lap van Stamp Attack UK. De andere tekst stempels, Dragon Queen en de cartoon vleermuis zijn van Kraftin' Kimmie. De stijl komt overeen met de Mr. pumpkinhead serie van mijn vorige blogpost alleen meer roze en meer glitter! Ik heb zwart glitter embossing poeder van Ranger gebruikt.
Het baksteen desinger papier is van Stampin'Up!


Mr. Pumpkinhead ATC


With these ATC's I enter the .Kraftin Kimmie stamps challenge #354-halloween

Tijdens het opruimen van mijn werktafel vond ik een paar ATC projectjes die nog af moesten. Toen ik mijn map uit de kast trok om ze op te bergen ontdekte ik dat ik helemaal niets meer heb gemaakt sinds mijn map is geplunderd op het Art Specially event. Daar moest snel verandering in komen, want ik kan komend jaar niet aan komen zetten met allemaal oude kaartjes. Gelukkig vloeide inspiratie rijkelijk. Ik vond een leuke Kraftin' Kimmie stempel die ik nog niet had gebruikt (oeps!).


Dit eerste setje met Mr. Pumpkinhead was erg bewerkelijk. Eerst heb ik de afbeelding gestempeld en die daarna afgeplakt met een masker van tape. Daarna heb ik de achtergrond gekleurd met 3 kleuren Distress ink. In het paarse stuk zie je wat heuveltjes, dit komt doordat ik stroken gescheurd tape heb gebruikt tijdens het inkten. Vervolgens heb ik nog wat achtergrond stempels gebruikt en als laatste de afbeelding nog ingekleurd.

Toen ik het tape masker weg wilde gooien vond ik het er eigenlijk wel leuk uitzien met al die kleuren en zo kwam ik op het idee voor mijn volgende setje ATC's. De gestempelde afbeelding uitknippen en het restmateriaal op een kleurrijke ondergrond plakken. Zie de foto's hieronder:


Daar lagen dan al die uitgeknipte pompoen mannetjes. Zonde om ze weg te gooien toch?! Ik heb ze daarom ingekleurd voor mijn volgende setjes ATC's. De achtergrond is eenvoudig gemaakt door 1 stempel in 3 kleuren onder elkaar te stempelen.